If you want color that truly doesn’t budge and won’t need reapplication, lip stain or lip tar-type products are your best bet. They work even better when combined by layering two different types of products atop each other. However, stains can’t really match the vibrancy and opacity of a true lipstick and tars can be very fussy to use. As someone who prefers bold lip colors and has highly-pigmented natural lips that render most lip colors invisible, I absolutely adore lipstick.
It wasn’t always this way. For years, I’d faithfully raccoon-ring my eyes before leaving the house but never wore lip products. My early experiences with overly-sticky, poorly-pigmented lip glosses and stinky, gritty lipsticks with little color payoff left me scarred. Lip stains slowly brought me back around to painting colors on my mouth, since they last a long time and aren’t at all messy after initial application.
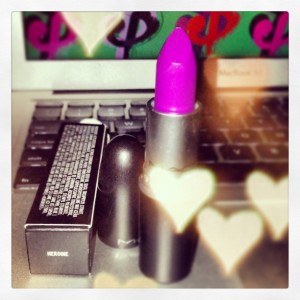
The gift of a then-limited color of MAC lipstick for my last birthday won me over; Heroine is now my signature color and I am officially a huge lipstick fan. With all apologies to lip gloss fans, I still hate color that slides around and off and must be frequently re-applied. Lipstick, however, can last a long, long time.
Step 0 – Prep
That number is not a typo. Remember when it was all about that base (sorry again)? You want a soft, smooth set of lips as your base for a perfect lip. Your lips need to be smooth and soft but not actively coated in any sort of hydrating product, meaning you have to do some of the prep in advance of the actual wearing of the lipstick.

Hydration: I’m sure you already know that drinking plenty of fluids is a good idea overall. Everyone’s always saying that they’re going to drink more water, but to be honest, I’ve become a lot better about drinking enough water since I realized that it was going to up my lipstick-wearing game. I was a little lax with my water intake over the holidays and that, paired with winter dryness, means my face is still paying for it. Sob (or not, since I don’t want to waste precious fluids through tear-duct excretion).
Moisturization: Lip balms are cheap and easy to use. If your lips tend to be dry, you should use a lip balm on days you aren’t planning to wear lipstick as well as every night.
Step 1 – Exfoliation
You could buy a fancypants lip scrub, but here are about a billion highly-serviceable DIY lip scrub recipes out there, mostly involving brown sugar and olive oil. Some people use an old, sanitized toothbrush, which is also just fine. I use E.L.F. Studio Lip Exfoliator because it is cheap, I can get it at Target, and I am both lazy and a sucker for cute yet convenient packaging. I have also been known to gift it to flaky-lipped partners for improved make-out sessions.
Step 1.5 – Priming / Plumping
Some people use a specialized product that primes and/or plumps the lips for color application, which can help the product to apply more smoothly and improve wear. Some products that aren’t intended for the purpose but that can be used as a lip primer, like concealer or NYX’s eye pencil, have the added function of lightening the lips. I find that doing so makes my lips appear chalky and dilutes my lip color, but others swear by it, so it’s worth a shot.
Step 2 – Lining & Filling
Line and fill your lips with a liner of your choice. Lip liner is not optional if you want your lip color to last. If you’re cheap and/or wear a wide variety of lip colors, like me, clear lip liner is what you’ve been looking for. I’ve tried the ones made by Urban Decay, Lipstick Queen, Obsessive-Compulsive Cosmetics, and Make Up Academy (MUA). My favorite is OCC’s, with UD’s in a close second. MUA’s is serviceable for the price, but I absolutely do not recommend LQ’s.
Step 3 – First Layer
Apply your first coat of lipstick and blot. I like to apply directly from the bullet for maximum oomph (and it also looks sexier which makes me feel sexier), but most pros recommend a lip brush.

Step 4 – Set
Take a plain, unscented, and most importantly lotion-free facial tissue. Peel the 2-ply layers apart so that you have two thin layers of tissue. Then, take a fan or kabuki brush and lay one of the separated tissue pieces over your lips. Use the brush to dust translucent powder over your lips through the tissue. Remove the tissue.
If you are okay with mattifying your lip color (or perhaps actually want to), you can apply the translucent powder or an eyeshadow in a color that matches your lip color without a tissue between it and your lips.
Step 5 – Final Touches
Apply your second coat of lipstick and blot. Prevent your lipstick from smudging onto your teeth using the finger trick.
Lipstick applied using these steps should last quite a long time. You can make it last longer by:
- drinking through straws
- eating with your teeth rather than with your lips
- lightly licking your lips before eating or drinking
- re-applying and blotting as necessary (to protect the base coat your created in Step 4)
- avoiding getting anything oily or sticky or moisturizing onto your lips
- blotting rather than wiping anything you get onto your lips
- finding the lipstick that works for your particular body chemistry
Got beauty questions? Drop me a line via the method of your choice: Twitter / Tumblr [anon enabled] / Facebook/ ask.fm (anonymous) / email


Bless this. I can only afford to do the lip liner one, but at the very, very least, it will keep a repeat of last weekend from happening.
I seldomnly use lipstick, but my go-to is MaxFactor Lipfinity. Horribly expensive, but really long lasting and not smearing. Believe me, my husband likes to put it to the test 😉
Also, to keep lipstick from your teeth:
Open mouth
Insert clean finger
Make a “kiss me” mouth around your finger and slowly remove it.
All lipstick that would have become a toothstick should now be on your finger
NICE. Bold lipstick is one of my 2015 resolutions, so this is a well timed guide! Also anyone who has suggestions for a red drugstore lipstick with staying power, preferably a warmer red, I’d love to hear em.
xyz, you posted this a loooong time ago, but on the off chance you’re still looking I adore Revlon ColorStay Ultimate Liquid Lipstick in Top Tomato. I’m a redhead with pinkish undertones to my skin, and it’s a really true red with a warm orangey base. It lasts allllllll day, too, like 14+ hours of eating/drinking/makeouts/etc. The only red I buy now!